Thursday, September 17, 2015

Packing a Day Pack

After Willie and I went out on our first excursion in our ATV, we started thinking of the things that we should have brought with us. When I was growing up and my dad or I went out on a hike or a drive my mom would always remind us to take a day pack. Just a backpack with some food and essentials in case we got lost, injured or stranded. I have a day pack which I keep in my car, but I hadn't looked through it for quite some time, so I decided to dump it out on my living room floor and get it organized again!

My pack is a hand-me-down from Willie. He bought it at an Army Surplus store a number of years ago. Come to find out, it is actually a fairly rare WWII French Foreign Legion pack. Go figure. I like it because it's got all sorts of straps, a sturdy frame, it adjusts down small enough that I can wear it comfortably, and it has big side pockets for storing all kinds of stuff. I also like that it's old. That part's pretty sweet too.

This first jumble is what I dumped out of my pack initially. I noticed that there were some things missing, and realized that I had split my survival gear up and had some more in another, smaller bag. In addition, there were some things that came out of my pack and were rattling around in my trunk.
This jumble is what was in my smaller bag and in the trunk of my car. Time to recombine everything!

The first thing I looked at was my clothing items. I had a hat for keeping off the sun, a stocking cap, a scarf and a pair of wool socks. I added in a pair of mittens, because no one likes frost bitten fingers. One day I will upgrade my hat and scarf to woolen items, but this will do for now.


I put it all into a roll up space saving bag and rolled all the air out of it. I made sure it was the rolling kind so that I could re-roll it no matter where I was at.

The next category of items is "personal care." Some wipes, toilet paper and feminine products. Last time I went to the dentist I decided to stow the toothbrush, toothpaste and floss I received in my pack as well. All of this went into a large zip top bag, and into the pack it went. 


Later on I found some hand warmers and stashed those in with the other personal care items.


I discovered that I had some rope, paracord and webbing in my pack. It all went into a zip top bag together.
Willie and I bought aluminum water containers to take with us on hikes and camping trips a while back. The benefit of having a metal container is that you can heat water in it. This style also has a loop on the top so you can attach it to your pack. I used a carabiner to clip it to a loop on the outside of my pack.


I have a very small and simple first aid kit for my pack. Basically it consists of bandages and gauze, antibiotic ointment, rubbing alcohol and allergy pills. For the alcohol and the pills we bought travel-sized containers and taped the lids on to prevent spillage. Stuff it all into this sweet jungle first aid pouch, and you're good to go!


Next I gathered up all my fire lighting stuff. I have steel wool and cotton balls saturated with petroleum jelly. Both of these things will catch a spark readily. I also have a magnesium bar and a striker. The magnesium can be shaved off to catch a spark as well.


The next bunch of items that went in are some survival related items. There are big black trash bags that can be cut apart and used as tarps or ground covers, drawstring bags to sack up items to keep the rain out, fish hooks and fishing line, aluminum foil, and some twist ties. You never know what situation you may find yourself in, and these items could come in handy.


I had quite a lot of emergency food in my pack, and most of it was still good. Each package is vacuum sealed and stamped with an expiration date. Can you spot the package in this photo which is no longer good?


The package on the left looks like it should: compact, with the packaging tight around the food. The package on the right has a leak somewhere, allowing air into the packaging. The packaging is no longer sitting snug against the food. This package should be discarded.


Aside from my emergency food, I like to pack an eating utensil, a small cup, some instant beverages, and a mess kit. The eating utensil has a spoon on one end and a fork with one serrated edge on the other and can be found in the camping department of most outdoorsy-style outfitters. The cup has a handle that allows it to be clipped or tied to the outside of your pack or your belt. My beverages pouch has tea bags, apple cider mix, and hot chocolate mix. You could also include soup or broth mix if you'd like.


Since I didn't want to use up all my space by packing two mess kits, I decided to open them up and see which is the better of the two. I decided that my grey kidney-shaped kit would work out better. It has metal handles, is more durable, the containers are decent-sized, and its kidney shape means I can carry it on my belt if I would like to. The round kit is a little more cheaply made, has plastic components, and I didn't care much for the size and shape of the containers.


Here are some basic components of any backpack. I know you all were getting antsy waiting for me to bring these into the mix! Always, always, ALWAYS pack a good knife. In a survival situation, you will die without a knife. A good pair of binoculars is a good idea. I have two compasses in my pack. One gets stored in the outside pocket, the other inside the bag in case the first one gets lost.


I have a couple of emergency flashlights. These are nice because they are a flashlight, and emergency flasher, and they have a whistle on them. This is handy if you are lost or stranded and need to draw attention to yourself for rescue. I also have an emergency roadside flasher. If your car breaks down you can use this to draw attention, either to alert people to the fact that you need help, or to keep yourself from getting run over while you repair your vehicle.


I had an otter box, and decided to keep it in there just in case I needed a waterproof spot to store items. I also found the world's oldest can of bug repellent, and decided I would keep it in there as well. Old repellent is better than no repellent, right?


I found my backpacking blanket in my trunk and washed it up. The straps on the outside of my pack are perfect for holding a rolled up blanket.


Here it is! The last little things that still need to be added are a poncho, and a lightweight jacket or long-sleeved shirt to keep the sun off. My poncho got ruined while bouncing around in my trunk. When I get a new one I will roll the blanket inside it, so that the blanket doesn't get wet.


Saturday, September 12, 2015

Growing and Multiplying Your Food

Here lately one of the themes of my brother's blog, Saving Money By The Numbers, has been cloning plants in order to multiply them. Here are his cloning related posts to date:


This frenzy of gardening-related recycling reminded me of some experiments that I have been intending to try for quite a while now. I want to see how well you can grow plants from seeds, pits, nuts, and fruit and vegetable scraps that you would otherwise throw away. I began researching this idea months ago, but had yet to begin my experimentation. Perhaps this is the kickstart I need! I feel like this sort of experiment will scratch that itch to grow new plants during the fall and winter months. Here are the posts I've already written for saving seeds that you might otherwise have thrown away:


Another idea I've been looking into is edible weeds, and trying to figure out how to cultivate and grow some of these items as crops. Some for me, and some for animal fodder on my little farm. Here are the edible weeds I've researched so far:

Thursday, September 10, 2015

Save Your Pennies: Pack a Lunch!

Turkey sandwich, pasta salad, berry applesauce, and a soda.
One of the best ways to save money is to avoid eating out whenever possible. One great opportunity for this is packing a lunch to take to work with you, instead of eating out on your break. Typically when one thinks about packing a lunch they think of peanut butter or baloney sandwiches, but it doesn't have to be! As long as your place of employment has a refrigerator and a microwave in their break room, your possibilities are many, and don't have to be boring!


My containers drawer.
What's the first step? Well, if you don't have a drawer or cabinet that looks like this, hop to it! If you are not willing to fork over the money for resealable containers, just remember what your grandma did. I remember looking through my grandma's refrigerator looking for the tub of butter and having to open several containers to find it. Butter, sour cream, cottage cheese, whipped topping, all of these tubs were saved and washed to be reused for food storage. Some brands of lunch meat come in resealable containers nowadays, too. Don't throw away what you can use again!

My spork and combo utensil.
Step two: utensils. At some point you will need to figure out how to convey the food from your repurposed Cool Whip tub to your face. When looking for utensils, don't look in the housewares department, look in the camping & outdoors department. In my lunch-packing repertoire I have reusable plastic sporks, as well as a few cool combo utensils. One end of the utensil is a spoon, the other is a fork with a serrated edge to be used for cutting foods. Granted, you could just buy plastic cutlery and throw it away each time, but that would end up costing quite a bit of money in the long run, and that's something we're trying to avoid.

Chicken Parmesan & spaghetti made with the extra sauce.
Next, what are you going to pack in your lunch? First off, leftovers! Whatever you don't finish, put away and eat later. Hamburger Helper, pasta, chicken and rice, pork roast, chili, whatever! Even if it's just a little bit. That little bit will go a long way toward filling your belly! 


Portioned up my brown rice.
Now, supposing you don't have leftovers, or don't have enough to get you through the week, you can also cook a meal that can be portioned out and eaten all week, I will typically make stroganoff, keema mattar, chicken ramen stir fry, brown rice or pasta salad. You can also buy inexpensive frozen, instant, or canned meals to pack in your lunches, but cooking your own is cheaper, and will likely result in tastier lunches!


The snack section of my pantry.
Once you have an entree for your lunch, what can you pack go with it? Whatever you want! Whenever I have time I like to whip up some baked goods to pack in my lunches. Tomato soup cake, Jell-o cookies, or coffee cake muffins. I also like to make Chex mix from time to time, especially since there are so many different recipes to try! When I don't have time to make or bake items to pack up, I buy inexpensive snacks. Chips, crackers, applesauce or fruit cups, granola bars, yogurt, or string cheese.

Delicious beverages!

Now, to wash it down! I decided quite a while ago that I was okay with drinking store brand sodas, so that is typically what goes into my lunches. From time to time I will buy juice boxes or juice pouches, so that I can reminisce about my childhood. There are also individually portioned drink mixes which can be added to bottled water. In the winter I pack pouches of hot chocolate or instant apple cider and use the mugs at work to mix it up. (I work at a nursing home, so they've got plenty of mugs, and a means of washing them.)


My lunch is all packed and ready to go!
Every day I pack up my lunch, put it into a plastic grocery bag, and tie it up. Why use a grocery bag? They are free, you can write your name and the date on them so your food doesn't get thrown away, and you can get two more uses out of them before you discard them. You will use it to pack your lunch in, and to pack your dirty dishes in to take home and wash. Just try to be choosy about which bags you use. I'm not really comfortable using bags from the thrift shop or the auto parts store to pack my meals in, and I trust you wouldn't be either.

Thursday, September 3, 2015

Bad Egg?

I got behind on washing my eggs and putting them away. They just kept piling up. The higher the pile, the less I wanted to deal with them. Finally, enough was enough, and I got busy. The only problem? Figuring out which eggs were bad eggs.


So, I wiped them all down, and commenced to figuring. Here's how to do it:
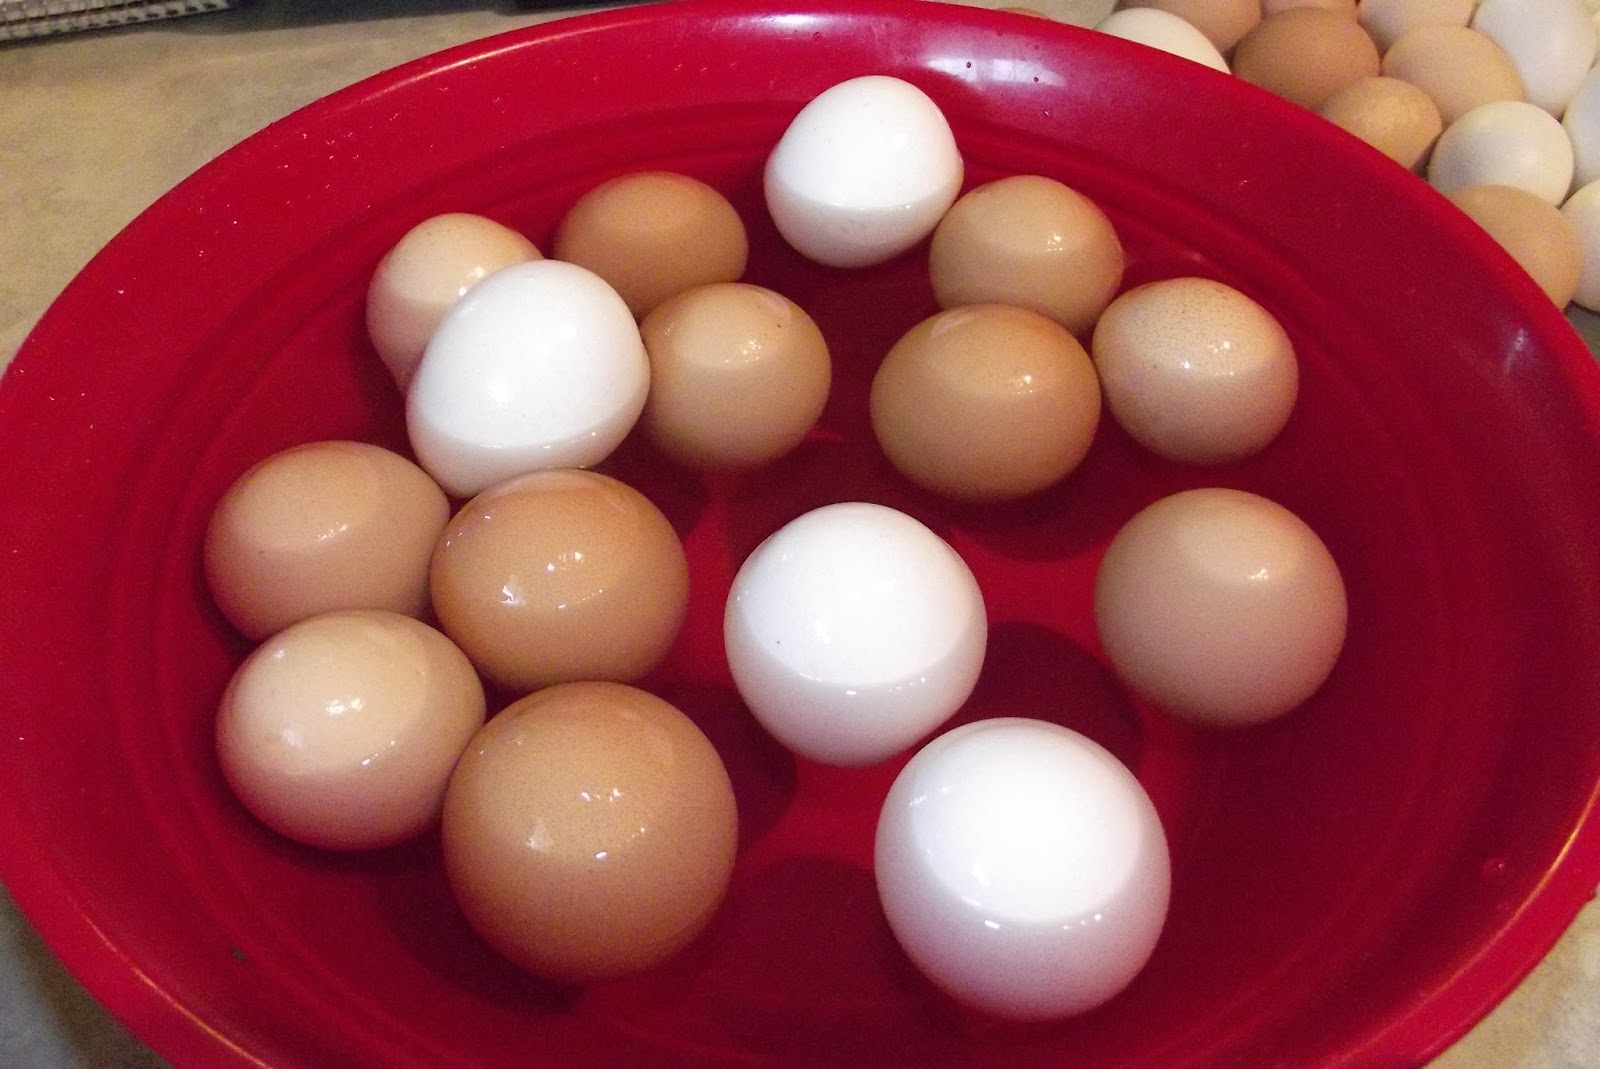
First, fill a bowl or bucket with enough water to completely submerge an egg by a couple of inches. Begin placing your eggs in the water gingerly, a few at a time. If you plunk them all in haphazardly, you risk breaking them, either from them knocking into each other or plummeting to the bottom of the container and cracking.


Pay attention to how your eggs are behaving in the water. If they float to the top right away and stay there, they are definitely bad. I found a lot of really bad eggs in my basket. One of them broke open, and then I could really tell how awful it was.


If they settle to the bottom, they are good. Eggs that lay flat are fresh. Eggs that stand on end, like the white one in the top of the photo, are a bit older. They are still fine to eat, but they should be put at the head of the line and eaten first, before they go bad.


Since I had put off putting my eggs away for so long, I only ended up with a few good ones out of the whole bunch. Imagine my dismay at having to throw away dozens of eggs, simply because I was being lazy. That's wasteful, and you all know my opinion on wastefulness.


To learn more about cleaning and caring for your eggs, look no further! 


Thursday, August 27, 2015

Food Preservation: What to Can


Bread and Butter Pickles from my
mother-in-law's pantry
We all know that canning is a great way to put the foods we grow in our gardens away for a rainy (or snowy) day, but what exactly are you able to can? 
Well, pretty much anything!

Jam, Jelly, Preserves, or Apple Butter
Peaches, Apricots or Pears
Apple Sauce
Pie Filling
Veggies (carrots, green beans, corn, etc.)
Potatoes
Tomatoes
Taco Soup, Dill Pickle Relish and
Marinara Sauce from my pantry
Pickles
Pickled Peppers, Okra, Squash or Asparagus
Salsa, Taco Sauce or Chili Sauce
Pasta or Pizza Sauce
Soup, Stew, or Chili
Barbecue Sauce
Meat
Fruit or Vegetable Juice
Chokecherry Jam from Mom's
pantry
In my family we have always had our canned "staples."
Grandma and grandpa always kept a fairly large garden, and grandma would can the resulting produce. Strawberry jam, canned peaches, tomatoes, chili sauce, salsa, and she also canned meat. I know what you're thinking: "WHAAT?! Canned meat?! Why would one need to can meat?" Well, grandpa worked for the state fish and game association and, therefore, went hunting on a regular basis. When he brought home a deer, elk, or pronghorn most of the meat went into the freezer, but a good portion was also canned by grandma. It was tasty, already cooked, and made the best loose meat barbecue sandwiches you've ever tasted. So, why can meat? Why not?!
Aunt Steph's Apple Pie Filling

At my parents house my mom made strawberry jam, peach jam, canned peaches, tomatoes, salsa, and pickles. At the house they live in now they have a peach tree that produces far too many peaches for any human to eat, so mom stays pretty busy canning jam and peaches each fall.

At our house Willie and I have canned taco soup, marinara sauce, green beans, dill pickle relish, potatoes, and tomatoes.

So, by now I'm sure you're asking "But what about your great uncle? What does he can?" The answer: Jalapeno jelly.


I've asked my family to take photos of the canned food in their pantries for this blog entry. Photo credits go to: Cheryl Nisonger, Pat Williams, and Stephanie Black.


Aunt Steph's Pickled Beets
Aunt Steph's
Raspberry Jam
Aunt Steph's Tomato Juice
and Crushed Tomatoes
Aunt Steph's Salsa
Aunt Steph's Bottled
 Venison
Aunt Steph's
Applesauce


Thursday, August 20, 2015

Chicken and Ramen Stir Fry

I found this recipe in a recipe book I bought a while back, and adapted it a little. I make it all the time to pack in my lunches I take to work. It reheats really well, it's easy to make, and the ingredients are inexpensive. It's a win all-around!

Here's what you'll need:
2 boneless skinless chicken breasts
2 packages of ramen noodles (at least one needs to be chicken flavored)
1 package of frozen stir fry vegetables
Stir fry sauce (I recommend Kung Pao, but any will do)

First cut your chicken into small cubes and set aside.
Open up your ramen noodles and take out the flavor packs. You will need one chicken flavored pack for this recipe, set the other one aside for another use. Cook the noodles, reducing the cook time on the packaging by half.
Drain your ramen noodles and set aside.
Get your frozen veggies all ready. (I dumped mine into a bowl so I could sift through and remove the water chestnuts. I don't care for those.)
Measure out 1/2 cup of stir fry sauce.
Heat a tablespoon or two of oil in your wok. If using a non-stick wok, keep the temperature at about medium high. If not, you can crank it up! 
Add your chicken and stir fry until you can no longer see pink. If there is too much liquid that collects in the wok, move the meat up on the sides and allow the liquid to boil away.
Next add the veggies. Stir fry until they are pretty well heated through. Again, if there is too much liquid that collects you can move the food up on the sides of the wok and let it reduce. This time, though, don't let it all boil away. Leave just a bit so that the noodles can finish cooking.
The noodles, sauce, and flavor packet should all be added now. Stir fry until the sauce is hot and coats everything in the pan.
I typically top my stir fry with dry roasted peanuts before I dig in! Whatever is left over I portion into containers and put away for my lunches.


Thursday, August 13, 2015

Drink Bottle Flower Vase

So, a while back there was a lady at my nursing home who was not doing so well. I decided to bring in some flowers to spruce the place up. My only problem? No flower vase. I decided to make my own!

I found an empty sports drink container and decided that I could figure out how to make it cute! 

First I took off the label and the cap. 

Next, I rinsed it out and cut off the neck. 

After it had dried out a bit, I found a metallic marker to decorate it with. It doesn't have to be metallic, I just happened to have a metallic one and decided to make my vase fancy! 

After you have fancified the vase, you will need some flowers. If you have some growing in your yard, go ahead and use those. All my flowers had either died or been eaten by goats, so I went down to the vacant lot on the corner. 

There I found a bunch of scarlet mallow, and cut a handful. 

I took them home, rinsed off the bugs, trimmed away some leaves and added them to my vase. I added a bit of water and took it over to the nursing home.