Saturday, August 30, 2014

Willie's Super Secret Cheater Ribs


The first set of ingredients you will need are a rack of pork ribs, minced garlic, pineapple juice, balsamic vinegar, and your favorite rib rub, I like a rub that is heavy on brown sugar and has just a little heat.


Unwrap your ribs, and use a sharp knife to remove any really fatty bits. Flip the rack over and remove the membrane, if it is present, by peeling a bit up, grasping it with a paper towel, and peeling the entire sheet away.


Once your ribs are all trimmed up, rub liberally with your favorite rub, reserving a tablespoon or so for seasoning your braising sauce.


Combine 1 can pineapple juice, 2 tbsp. balsamic vinegar, 1 tbsp. minced garlic, and reserved rub. This will be your sauce for braising the ribs in the oven.


Cut a sheet of aluminum foil long enough for you to wrap your ribs completely.


Wrap, pinch and seal all but one end of the foil.


Pour your newly made braising sauce in through the open end, and seal the foil tightly.


Place your wrapped and sauced ribs on a baking sheet and bake in your oven at 225 degrees for 2 1/2 hours.


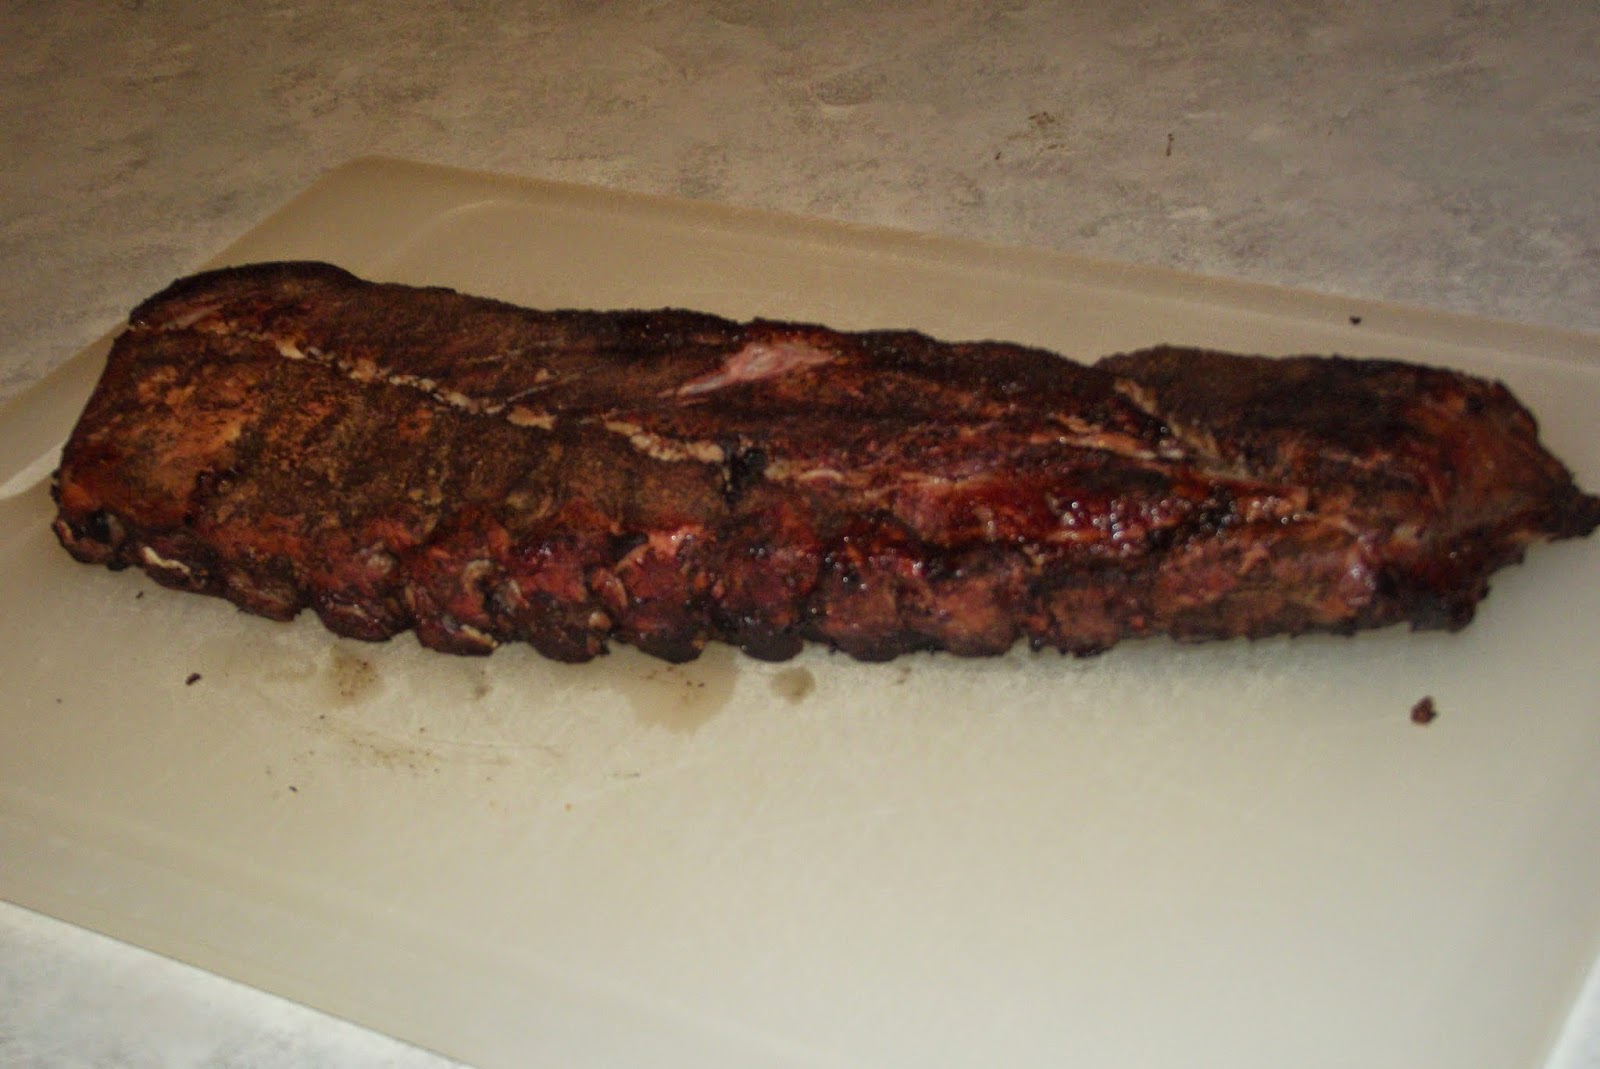
Remove your braised ribs from the oven and allow to cool slightly. Very carefully turn your ribs so that one end is up.


Snip a hole in one corner of the foil on the upturned end. Pour the liquid into a heat-resistant vessel and cover.


Store your liquid and ribs in the refrigerator until the liquid is completely cooled. All of this can be done the day before your barbecue so that, on the big day, you wont be chained to your kitchen. Once the liquid is cool, you can remove the fat puck from the top. Discard the puck and reserve the liquid.


Empty the reserved liquid from braising your ribs into a medium sized saucepan. Don't be alarmed if it is a strange looking conglomerate of gelatin, liquid and meaty sediments. This is good. This is flavor.


To this you will add 1/3 cup ketchup, 1/3 cup honey, 2 tbsp Worcestershire sauce, and a your favorite hot sauce to taste, I like a couple of dashes of Cholula. Whisk your ingredients together and heat over medium low heat, until reduced by half, about 30 minutes, stir every couple of minutes.


While your sauce simmers and reduces, light your charcoal and get your grill ready to receive the ribs.

Don't forget to check the sauce!


Cook your ribs on your grill, off of direct heat for 30-40 minutes.  Adding a couple chunks of apple wood will really add a lot of flavor.  Avoid using hickory or mesquite, as they tend to make pork sour if over smoked.


After the ribs are heated throughout and have a good color remove from the grill and make a loose fitting tent of foil to place over the ribs until the sauce is sufficiently reduced.


Slice your ribs, drizzle with delicious home made sauce, and enjoy with plenty of napkins on hand!


Thursday, August 28, 2014

Wastefulness

During the past decade of my career in the workforce there have been two settings in which I have learned lessons on wastefulness: the restaurant industry, and the skilled nursing industry. The lessons learned working in restaurants are not much fun, and seldom transfer into day to day home life. The lessons learned from residents of a nursing home are just the opposite. Lessons learned from the elderly typically have a good story or saying attached, are applicable to everyday life, and often offer us a glimpse into history. Many of the residents I work with are either old enough to have lived through the great depression, or their parents lived through it, and they heard the stories and phrases from them. Although some of the phrasing may be dated, the lessons contained still hold true.

I was helping a gentleman in his 90's wash his hands in the restroom. He carefully scrubbed and rinsed them, and I handed him two paper towels. He looked at the paper towels and said "What in the hell did you give me two for? One would have done the job." I told him that I had given him one for each hand. I didn't tell him that I usually use three for myself. His daughter was nearby waiting for us to finish and she said "Tell her how many sheets of toilet paper we were told to use growing up, daddy." His reply: "Two!" She said "Tell her why, daddy. Tell her about the pennies." The man told me this: "Sheets of toilet paper cost pennies. Save five pennies, you've got a nickel. Save that twenty times, you have a dollar." 

Now, I have a good idea that the vast majority of readers will agree that two sheets of toilet paper is an insufficient number to use, but the idea behind the limit is a good one. According to earthisland.org, the average American uses 57 sheets per day, which adds up to be 50 pounds of paper per year. I think that sometimes we forget that pennies add up to be dollars. Whether it be paper towels, toilet paper, water, gas, or electricity, saving pennies adds up! Pay attention to your usage. Use a towel to dry hands and dishes, rather than paper towels. Reduce the sheets of toilet paper you use. It's okay if your hands happen to get dirty, you're going to wash them anyway (and dry them with a towel, right?) Take shorter showers, turn down your water heater, open your windows at night instead of turning on your air conditioning, put a sweater on in winter rather than turning up the heat, water your lawn and garden during cooler hours, turn off lights in rooms you aren't using.
These are easy habits to establish. At my house we wash  most of our dishes by hand, even though we have a dishwasher, to save on electricity. Our dishes also end up cleaner and it takes less time to wash by hand. When washing laundry we hang out items that are more difficult to get dry in the dryer. Once dry, all you need do is put them in the dryer on fluff with a dryer sheet. This will soften the clothes, but you won't be using electricity or gas to dry them.
If you want to take it a step further, spend some money to save some money. Install low-flow faucets, toilets and shower heads, replace light bulbs with compact fluorescent bulbs, update your water heater and your refrigerator, install heat retaining windows and replace weather stripping around doors, install a light sensor on outdoor lights so they only turn on when it's dark out. All those pennies could add up to make you a whole lot richer!


Another lesson I learned pertains to wastefulness in the kitchen. I was helping a lady who is in her late 60's, and exchanging stories with her. She told me a phrase that her mother often used. "A woman can throw more out the back door with a teaspoon than a man can bring in the front door with a shovel." 
The meaning behind this is that even if the breadwinner of the home is bringing in plenty of money for the things you need, it's all for naught if it is going to be wasted and "thrown out the back door." According to USNews.com the average American family wastes up to 25% of food and beverages purchased. This could add up to thousands of dollars a month. I know I am just as guilty of this as anyone else. So, what can be done about it?

Only buy things that you know you will use before it expires. If you need creamed corn for a recipe, but your family does not make a habit of using creamed corn for anything else, just buy a few cans for the few times you make that particular recipe. 

Cook meals that are the appropriate size for the number of people being served. If you happen to have leftovers from your meal, put them away, and eat them later. If you have made a dish in which a large batch is required (We often make huge pork shoulders for pulled pork, or big pots of taco soup) utilize your freezer, or canning jars to put away what's left. If you have cooked and put away a lot of meat throughout the week, make chili with it. There are only two in our household, so most recipes give us leftovers, and although we do a good job of putting them away, those leftovers typically get forgotten in the refrigerator or freezer. Put it away, but don't forget to assess your leftovers before you make a whole new meal!


If you find a way to save money on the front end, such as markdowns, case lot sales, family deals, or bulk purchasing, you should have a way to preserve your purchases so your savings don't go to waste.
Family size packages of meat can be portioned into one-meal portions and frozen.
Unopened sauces such as barbecue sauce, ketchup, mustard and mayo don't have to be refrigerated, so find a spot in your pantry or food storage and line those bad boys up.
Hot dogs, bacon, and packages of luncheon meat can be frozen, then defrosted in your fridge for later use. Loaves of bread, hot dog buns, and hamburger buns all freeze well. Just put them into the fridge a few days before you will need to use them.
Bulk sized sacks of staple foods such as flour, cornmeal, sugar, rice, and pasta can be kept in 5 gallon buckets with tight-fitting lids. This will keep the foods fresh, contained, and will help keep pests such as weevils out.
Organize canned goods, boxes and jars in your pantry or food storage and rotate stock, move the oldest food forward to be used first so that it doesn't expire before you have a chance to eat it.
If you buy produce on sale, you can freeze, dehydrate, pickle or can most anything. Make sure that you preserve it before it goes bad in your crisper drawer.
Finally, look at the portions of food that you are serving and how much it costs to cook each meal. In America we have a tendency to eat large portions of more expensive foods, such as meats, and scoff the cheaper stuff which is just as filling. You can use the cheaper foods to stretch the meal to feed everyone involved. Here are some examples: Growing up we served a small portion of a cheap meat (cubed steaks, pan steaks, pork chops, chicken etc.) and filled the meal in with potatoes, rice, noodles, vegetables, salad, rolls, garlic bread or whatever else we had on hand that sounded like it would go well with the meat. If we had pizza or pasta we had salad and garlic bread. We added danish dumplings to homemade chicken noodle soup for an extra filler, and ate it with bread and butter. Chili with beans often topped burritos, grilled cheese sandwiches and tamales to make them stick to your ribs. Click here for some of the cheap and easy things we ate at my house growing up: Mom's Cheap and Easy Recipes   You could also look into depression-era recipes, pioneer recipes, and colonial-era recipes. These were tough times to live in, and more often than not tough times make for cheap yet delicious recipes. Be conscious of food preservation and waste, be creative with your meals, and don't forget the filler foods to round out your meals!

Thursday, August 21, 2014

Chickens - Which Kind to Keep?

The big question you need to ask yourself is: what you will be using your chickens for? 

Pepperann (back) and Buffy (front) are Plymouth Rock, and Red Star hens. They are considered to be dual purpose birds, as they are a heavy-bodied breed, suitable for eating, as well as good egg-layers.

The three main uses for chickens are meat, eggs, and showing. More often than not a breed of chicken will fall under two of these categories.


  • Meat chickens are heavy bodied, muscular birds, which typically grow quickly.
  • Egg laying birds are typically light bodied, and may lay up to 7 eggs in a week, although it is more typical to lay 4 or 5 per week to qualify as an excellent egg-laying hen.
  • Ornamental breeds are bred for specific unique characteristics such as color, long or uniquely shaped feathers, feathered feet, or tiny size.
  • Dual-purpose birds are those who fall into more than one category. It is possible to have a dual purpose bird which is heavy bodied, but is also a productive egg layer. It is also possible to have an ornamental bird which lays eggs or makes a decent fryer bird.
If you decide upon keeping chickens for meat, be prepared to see those cute little chicks grow up and be slaughtered. It's not an easy thing to do, so prepare yourself thoroughly. Meat birds are typically slaughtered when they are relatively young. Modern dedicated meat birds have been selectively bred to get huge in a short period of time. The older the bird, the tougher the meat, so it comes in handy to have a young bird which is ready to slaughter early. The decision to be made here is if you want a large chicken or a small chicken. Cornish rock chickens get to be very large, while Cornish game hens stay smaller. Another choice to make is if you are going to raise a modern breed or a heritage breed. Modern breeds tend to grow faster and, therefore, are ready to slaughter at a younger age. Heritage breeds grow a bit slower, but make tastier table birds.

Two-Piece is a White Leghorn hen. Leghorns are excellent egg-layers, but lack the body mass to be a roaster chicken. If considering keeping Leghorn chickens, bear in mind that they are a very loud breed!

If egg-laying is what you desire, there are a plethora of birds to do the job! The first thing to look at is how many eggs your family consumes in a week's time. If you seldom eat eggs, you will want to look into a slower laying breed. The next thing to look at is what size eggs you would like. Chicken egg sizes range from peewee to jumbo. If you do a lot of baking, a large or extra large egg is what you should look for. If you are just looking for eggs to cook up for breakfast or to boil up for a snack, any size will do. You could also factor egg color into your decision. Chickens have been known to lay white, cream, tan, dark brown, green, or blue eggs. Consider, also, if you want the birds just for egg-laying or if you would like to slaughter them. There are some great heavy-bodied birds that are champion egg-layers too! The last thing to think of is whether or not your hens will go broody. A broody hen will lay eggs (or steal them) and sit on them to hatch them. If you have a rooster and you would like your chickens to propagate, this is fine. If, however, you are interested only in having the eggs for food, this behavior may be undesirable. Not only is it difficult to get eggs away from a broody hen, but the hen will stop laying while she is sitting on the eggs, and it can often be difficult to break a hen of her broodiness.

The last category of chicken to consider is the ornamental category. If you are looking for a fun and flashy pet, or a breeding and showing hobby, these are the birds for you! The first thing to contemplate with ornamental birds is whether they will be for breeding and showing,  just a pet, or a useful pet. The next thing to consider is whether or not your need of chicken will require any special care. Long or delicate feathers may become damaged easily, feathery head crowns may obscure vision and make a bird more susceptible to predators. If you're chicken will be a pet, it's attitude and flightiness must be considered, as well as its noise level.

A good, short, yet comprehensive list with information on chicken purposes, egg-laying ability, temperment, size, and cold-hardiness can be found here:

My Pet Chicken Breeds List

Thursday, August 14, 2014

Saving Seeds from Peppers

If you've got a good looking pepper, and you'd like to grow more of the same, I will show you how to save the seeds to plant in your garden!

What you will need:
  • Good looking pepper
  • Sharp paring knife
  • Cutting board (optional)
  • Fine mesh strainer or seive
  • Paper towels

First, if you have a bell pepper, cut all the way around the stem and lift to remove. If using a chile pepper or similarly shaped pepper, cut off the top and slice in half length-wise. Use your thumb to scrape off the seeds and collect them in the mesh strainer, discarding any bits of membrane that may come off with the seeds. If you are using hot peppers, be sure to wear gloves during your seed-retrieval endeavor.

Rinse your seeds thoroughly in the mesh strainer under running water.
Spread the seeds out on paper towels and let them dry for a few days. Put your seeds in an envelope or zip top bag, label, date and put away in a cool, dark place to be planted next year!

Saturday, August 9, 2014

My Baby Goats are All Grown Up!

Ronnie and Shaggy, the first day we got them! About 9 months old.

    
Shaggy, gassed out after chasing me!
Ronnie, looking very curious.
First there were two goats, Shaggy and Ronnie, and they were the best of friends! Shaggy was very friendly and personable, a cross between a Nigerian Dwarf and a pygmy,  while Ronnie, a full Nigerian Dwarf, was very skittish and nervous. When Shaggy and Ronnie came to our house they were about 9 months old. When December rolled around Ronnie came into heat, so we thought it would be fun to have some baby goats roaming around! Since Shaggy is a wether (a neutered male) we would need some help for this task! We "borrowed" a billy goat from Dan the Goat Man. This billy goat's name was Wee-Man and he was a handsome spotted goat. Eventually I began to call him the bully goat, because he was always picking on Shaggy. Wee-Man stayed at our house for a month, and we sent him back to Dan fat, healthy and well-satisfied. Now we just had to wait to see if anything ever happened between Wee-Man and Ronnie goat. When Willie had gone to pick up our goats there was this tiny little newborn pygmy goat that was SO excited to drink milk that she she would suckle, then yell, suckle, then yell. He got to pick her up, and she was so itty bitty!
Dani, 4 months old


At the beginning of the year, we had gotten some money back from taxes, and we decided to pay Dan the Goat Man a visit. There she was, that tiny little goat Willie saw before. She was actually Shaggy goat's little sister, she was born on our anniversary, and they had named her Frankie. She was still cute and little, and still yelling! She looked like a little sheep. We decided to bring her home, and we named her Dani. If only we knew what we were getting ourselves into! Ronnie had already established herself as the "queen" goat, and wouldn't let little Dani in the house. Poor little Dani would just sit out in the rain crying and crying. Eventually I had to step in. Whenever Ronnie goat would push Dani out into the rain, I would come out, push Dani goat back into the house, and push Ronnie goat out. Gave her a taste of her own medicine. She didn't care for the flavor. It only took a few times of pushing Ronnie out the door, and keeping her there, before she realized that I'm the queen goat, and I want Dani in the house.
Ronnie's belly is getting fat with babies!
Eventually, Ronnie started to get kind of fat around the mid-section, and our suspicions that she may be pregnant grew. We got more and more anxious to know how many babies she would have, and to meet the little fellows. I thought for sure that for as big as she had gotten, she MUST have at least three kids kicking around in there. She began to look as wide as she was tall! We would just have to wait.


Look at how tiny Dani was compared to her friends!


Little Dani goat got bigger, but she didn't get any quieter. We nearly went insane! Whenever we were outside, she was quiet, as soon as we left, chaos. Eventually we figured out that little Dani was lonely, she was the third wheel in our little goat family, and people were the best friends she had. Goats are kind of cliquish and Shaggy and Ronnie picked on her, since she was the new goat. Since she was too small to fight back, all she could do was run away and call for her friends. She was a sad little goat for awhile, but we loved her and spent as much time with her as we could.

Two tiny, spotty goats!

One day, Willie and I came home, and we got our little bucket of grain and a fat flake of hay, and went into the back yard to feed the goats and chickens. We had been working all day, and, therefore, had been away from the house for the majority of the day. Little Dani came running out to greet us, so did Shaggy goat, but there was one goat missing. We looked out to the goat house and saw Ronnie standing in the doorway, then we saw a little flash of white around her feet. She had given birth while we were at work! We had prepped and planned and worried about when she would give birth, we even had a baby goat receiving kit with towels, and bottles, and milk replacer, just in case Ronnie rejected the babies. So, here we were, Ronnie didn't even need us. She did a great job! There were two little tiny spotty goats in the house, that hadn't been there that morning. Now we just had to give them a once-over and find out if we had little billies or nannies.
Jezebel and Toki, so adorable!

Turns out, we had both! The little oreo goat was a girl, and we named her Jezebel. Her brother, with the brown socks, we named Toki. They were bouncy, soft, adorable, and adventurous. Ronnie was a great mom, which means she was always worrying about those little fellows. Dani goat wasn't allowed to play with the babies right away, but at least Ronnie was too busy to bully her incessantly. As the babies got bigger, it was becoming clear that we would have to make a decision about baby Toki's "manhood." At 7 weeks old he was already paying a lot of attention to the lady goats. We talked to Dan the Goat Man, so see if he wanted a little stud goat. Dan thought long and hard, and decided against keeping Toki as a stud. So, the decision was made to wether him.
Dani, biting baby Wolfie's ear.
Dani was my helper goat. She rode along with baby Toki to keep him company while we drove over to Dan's house. While the unpleasant business of banding Toki was taking place, Dani goat went to meet the baby pygmies. Since she was bigger than them, she made it her duty to headbutt all of them, except baby Wolfie. Wolfie had her ear bitten, as this photographic evidence suggests. We went back home, and Toki walked funny for a couple of days.


Ronnie, on "vacation" at Dan's house.

Once the kids were about 4 months old, we decided it was about time that they were weaned. So, mama goat Ronnie went on vacation! I loaded her up, and took her over to Dan's house. While she was there, not only did the babies get weaned, but Ronnie also came back a bit more humble, and a bit thinner. Having to fight the dairy goats and the gigantic boer goats for food over the course of a month had taught her a lesson on not being a jerk, and had served as fat camp for her to lose the baby weight. While Ronnie was gone, Dani tried her hand (or hoof?) as queen goat. The results were disastrous. Dani thought that rather than sleeping in the house at night, it would be more fun to stay up all night, or sleep under the stars. She was very proud. Headbutts and ear biting abounded.

Shaggy, waiting for his friend Ronnie.


Meanwhile, Shaggy was missing his friend. He had gotten an injured eye, and a facial abscess. He had to have two kinds of ointment in his eye twice a day, have his abscess flushed twice a day, and get penicillin shots twice a day. He was so sad, and he cried and cried when we had to give him his medicine or clean his abscess. When Ronnie came home he was so excited! All he wanted to do was put his head on her, and fight. (That's what goats do, they fight when they are happy, when they are angry, over food, treats, and spots to lay down and nap.)

Jezebel, right around her first birthday.


Look at how big Toki got, and how small Dani stayed.

A couple of months ago, the baby goats had a birthday. Now, they are yearling goats. Jezebel is still a pretty small goat. Her coat has changed a bit as she has gotten older, showing some gray spots intermixed with the black spots. Toki is a mammoth of a goat! He is already as big as his mother. They are the two fattest goats I've ever seen! Toki's brown socks and spots have faded to tan, but he still retains his handsome markings. Dani is almost two, and is still rambunctious as ever! She hasn't gotten very big. She is nearly the smallest of the goats now. Ronnie still lets her have some boss duties, but doesn't let her forget that Ronnie is the queen goat.
Handsome (and round) Toki goat.
Shaggy and Ronnie will turn three this winter, and even though Ronnie is a round ball of fat goat, Shaggy is a skinny little fellow. He is the friendliest, most personable and well-behaved of the goats, but, unfortunately he is also the one with the most health problems. In addition to his injured eye, two facial abscesses, an infection, hoof rot and a broken horn, Shaggy was exposed to CAE. CAE is a retrovirus found in goats which causes chronic, progressive arthritis and weight loss. He will have it for as long as he lives. Despite being a thin, little, slow-walking goat, he is still very happy. He hangs out with his friends, takes lots of naps, cuddles with his people friends, and tries to get involved in games of "chase the goat." As long as he is still happy, we will keep Shaggy around. If his CAE progresses to the point where he is in a lot of pain, or is an unhappy fellow, we will do what we need to do. Meanwhile, we've got a bunch of silly, happy, loud, sometimes destructive, characters that live in our back yard, and are our "in the yard" friends. We love them, even if they don't let us sleep in any later than 9:30.
The End

Thursday, August 7, 2014

Mom's Brown Rice

An important thing to note about this recipe is that it is not a dish made with brown rice, rather it is a rice dish that is brown in color, and one of my favorite recipes to cook and eat all week!

Ingredients:
1 lb. beef stew meat
10.5 oz can condensed beef broth
6.5 oz. can sliced mushrooms
1 cup water
1 cup white rice
salt
pepper
garlic salt
vegetable oil
butter or margarine

First, put a small amount of vegetable oil in the bottom of frying pan or skillet, heat over medium-high heat. Cut larger chunks of stew meat in half, season to taste with salt, pepper, and garlic salt. Brown the beef in your oiled skillet until just brown on all sides, set aside.


 In a large skillet, melt a few tablespoons of butter over medium heat, add rice and cook, stirring frequently, until rice is golden brown. Add to your rice the beef broth, un-drained mushrooms, water, and stew meat.
 Bring to a boil, reduce heat and simmer uncovered about 20 minutes, or until rice is tender and liquid is absorbed. 


Serve with your favorite vegetable, or a salad. I like to add a good measure of pepper to my rice before I eat it! Yum!

 This recipe will easily feed 5 people, especially if you include a side dish.