Thursday, March 31, 2016

Crochet Rag Rugs


The first step to making a crochet rag rug is making your rag yarn. My favorite things to turn into rag yarn are sheets and pillow cases because they are cotton, they don't stretch, they come in all sorts of different colors and patterns, and you can find them cheap at thrift shops and yard sales! You could also use fabric scraps from sewing projects, or old t-shirts if you don't mind the stretchiness. Heavier fabrics like denim can be used, but will need to cut thinner and are a bit more difficult to work with (because they are heavier and thicker.) Choose a color scheme, hit the thrift shop, and stock up! Don't be afraid to mix patterns, because you won't likely be able to distinguish the patterns very easily once the fabric is in rug form. I just bought new pillow cases, so my source material for this demonstration will be all the random cases that I would have otherwise thrown away.


Once your source materials are gathered, cut or tear into strips about 3/4 to 1 inch wide. I like to use pinking shears so there is less fraying and fewer strings to deal with.


Once you've got a pile of fabric strips you can get started sticking them together. There are a couple different ways that I know of to do this.
The first method is to sew the strips together, end to end to form your yarn. This will give you a cleaner look, but is more time consuming. Besides, I like a rustic look for my rag rugs, so I use the second method:
Cut a slit in the end of each strip.


Pass the end of one strip through the slit in the other, then pass the long end of the first strip through it's own slit.


This will make little slipknots, which are easier to work with while crocheting than if you had just tied the ends together, making big bulky knots.
I'm sure that there are other ways of doing it, but I have yet to figure them out. So, these are the methods I go with!


If you need a bit more help with the attachment of the strips, here is a video that shows the method a bit clearer. Skip right to 5:08 for instructions on making rag yarn.


Wind your rag yarn into a ball as you add more strips, that way you won't end up with a huge tangle. Once you have a goodly sized ball, it's time to begin. I tend to make my fabric rugs into small round rugs, but there are all sorts of shapes and sizes you can make.
I've started a rectangular rug with the rag yarn I made for this post. In addition to circles and rectangles I've seen squares, ovals, hearts, and all sorts of different patterns and combinations. I found a few easy patterns online to give you some inspiration, and some guidance. I'm not a good pattern writer, so I found some folks who were!

Thursday, March 24, 2016

Scrap Yarn Afghans

I really, really, really like to make afghans out of scrap yarn. It may be classified as a sickness, OCABD (Obsessive Compulsive Afghan Building Disorder.) Not sure, not a doctor. Anyhow, I'd like to share some of my kooky ideas and inspirations, and maybe you can get a glimpse into my afghan madness!

Although I like my afghans to look random, my anxiety and compulsiveness won't allow it. So, I devise a set of rules for each afghan. Crazy? Maybe. Effective? Certainly! I will include some examples of my "rules" with each sample afghan to illustrate my point. So, the most important first steps seem, to me, to be figuring out a theme or color scheme, and devising which pattern you would like to use. I've used various types of granny squares, granny triangles, stripes, v-stitch stripes, ripples, and even made a few star-shaped afghans.

Granny squares, using variegated and multi-color yarn with no white in it (except the one square that is black and white only.) The centers of the squares are made up of two to five rows of the variegated color, then enough black edging to make the finished size six rows.
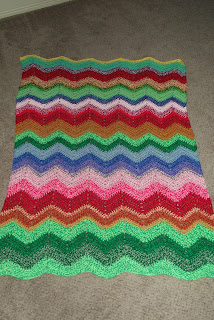
Ripple afghan based on the pattern "Rustic Ripple" in the book "Ripple Afghans to Crochet" by Leisure Arts. Crocheted with two strands at once, and alternating colors in rainbow order. At least one row, but no more than five rows per two-stranded color combination.


Based on "Super Star Afghan" by The Crochet Crowd on YouTube. All shades of yellow and gold. Each color is at least two, but no more than five rows.

Granny Square Stripes. Each square is made of 1-2 rows of a color from the color scheme (red, burgundy, orange, peach, brown) and 1-2 rows of black, to make each square 3 rows in total. Crochet 80 squares. Ten squares are fastened together to form a strip, eight strips in total, and one of the contrast colors is used to make a row of single crochet around each strip. Using black, make a row of double crochet around each strip. Attach strips together with black, and finish with a row of double crochet around entire perimeter.
Ripple afghan based on the pattern "Rustic Ripple" in the book "Ripple Afghans to Crochet" by Leisure Arts. Made with two strands of yarn at once. Colors are orange and peach, and variegated/multi-color yarn with orange in it as well. Alternate solid sections with variegated sections. Each section should be at least two rows, but no more than five.


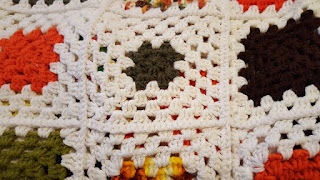
Granny squares made with orange, green brown, and variegated yarn containing those same colors. Colored portions of  squares are at least two, but not more than five rows. Edges are between 1-4 rows of white, enough to make each square six rows in total.
Wheel granny squares. Pattern can be found in "Vanna's Afghans A-Z," by Leisure Arts, as part of her "Zebra "Garden" pattern. Pink, purple, mauve, and blue, as well as variegated containing those same colors. First two rows of center "wheel" are same color, last row is different. First two rows of square portion are the same, last is different. All the squares are joined together by light pink yarn, using a single crochet and single crochet rows of various colors make up the border.


Now I just have about a dozen more to finish up! (sigh) I really may have a problem!
Thanks to my sister, Katie, and my aunt, Roni, for sending over pictures of the afghans I made for their families!


Thursday, March 17, 2016

Chickens - Raising Chicks

Our chick brooder
The first step to raising your chicks is to make them a brooder. Although you can make yourself a large, fancy, expensive brooder, if you'd like, a simple storage tote will work just fine. I like to use a clear tote, so that the birds can see out and get used to the "outside world." Place your brooder someplace where it will be warm and bright, but won't be drafty. Our brooder is in our dining room, close enough to the window to catch the sun, but far enough away that the chicks won't get cold. You will need some sort of bedding, I have used recycled paper bedding here, but pine shavings or some other type of bedding such as this should be fine as well.
Our chick accessories
Now that they have a place to live, they need some accessories. You will need a feeder, a waterer, a lamp and bulb, chick grit, and chick starter feed. The feeder and waterer I got are just metal bases that you can screw mason jars onto to hold the food and water. It is cheaper than buying the larger style, and if you already have the jars, you might as well use them, right? Since chickens, like most other birds, use rocks to help them digest their food, your chicks will need some grit to help them digest. Chick grit is tiny bits of rock, just bigger than grains of sand, which the chicks can ingest and use to grind their food. We already had a heat lamp from when we owned our tortoise, and we used a 60-watt traditional style bulb to keep the chicks warm. Now, please note that there are a number of people who will warn against using a regular light bulb to keep your chicks warm. The claim is that it will not keep your chicks warm enough, and they will get chilled and die. While this is certainly true if you are raising many chicks at once, or are unable to hang your lamp low enough to achieve the proper temperature, for our three chicks, in our already warm house, with the sun shining in, and the lamp hung low enough, we have done just fine. How do I know it was warm enough for them? Two words: laser thermometer. Oh, and they didn't die. That too.

The chicks in their new home
Once we put our brooder together with its accessories, we had to make a few adjustments. First, we put a pie plate under our waterer to keep wet bedding to a minimum, and we removed the hanger for the lamp which clamps to the side of the bin, and instead suspended the lamp above the brooder so that we could more easily maintain the correct temperatures.


Ruby, Pauline Headbuttington, and Papa Emeritus II.
When selecting chicks, take some time to observe them. You want to look for a chick who is eating, drinking and moving around. If a chick looks lethargic, is laying around, or doesn't seem to be eating or drinking, you should probably pass it up. Likewise, if it has cloudy eyes, dull or pale looking beak or feet, or if its breathing seems to be labored, it may be ill or under-developed. Look for bright shiny eyes, clear of mucus, clear nasal passages, good-looking down, and all the energy you would expect from an adorable baby animal. Don't let the salesperson scoop up any old bird to sell to you, show them the ones that you want. Otherwise, you may end up paying for a bird that is on its last legs.


1 week old: impressive wing and tail feathers!
Please note that these birds are eating, drinking, pooping machines and you will need to clean up after them frequently. 
2 week old chicks
This also means that they will grow very quickly, and it is quite amazing the changes that happen seemingly overnight (and sometimes literally overnight!)


My lid I added at around 3 weeks.
Eventually the time came when my chicks began testing out their now hen-like wings. It only took one time finding a chick perched on the side of the brooder before I decided that a lid needed to be a thing we had. I drilled holes all across the lid for my bin, and used a saws-all to cut a hole large enough to accommodate my lamp, but not so large that a chick could escape through it. (Though they tried.)


My 4, almost 5, week old peeping toms.
When the chicks grew large enough to stare at me through the opening in the lid when I moved the lamp, I began contemplating their release. You should always make sure that your chicks are fully feathered, and that night time temperatures don't drop too low before putting your chicks outdoors. Ruby and Papa were ready to go out, but I decided to give Pauline a few more days, because she had been sick and lagging behind the other two.


5 week old chicks look like tiny hens.
I was very nervous to put my little hens outside, and I went to all corners of the yard to "bird-proof" so that there were no gaps or spaces in my fence where tiny birds could squeeze through and escape. I also monitored their interactions with the established group of chickens and ducks. It took a day or two for them to figure out their new food and water situations, but it only took a few feathers getting plucked to tell them to steer clear of the mean old "big birds." My hens were fine to go outside after just 5 weeks, but I have heard of many people who brood them longer.

Thursday, March 10, 2016

Pollinators - Meet the Pollinators

We all know that honeybees pollinate our fruit trees and vegetable gardens each spring, but there are many other animals that contribute to successful pollination in the United States. Many of these animals you may not even be aware of. I'd like to teach you some basic facts about the pollinators that frequent your yard.

Bees - There are two different types of bees which may frequent your yard. The first type is the one that we are most familiar with. They are the bees which live in communities, such as honeybees or bumble bees. The other type are solitary bees. Solitary bees are sometimes also referred to as native bees, and include such species as leaf cutter and carpenter bees.


Wasps - Wasps contribute somewhat to the pollination of plants. Since wasps lack the fuzzy, hairy bodies of their cousins the bees, it is a bit more difficult for the pollen to stick to them and be transferred from plant to plant. If your worried about encouraging wasps to hang around, keep in mind that solitary wasp species are typically less aggressive than those that live in a community.


Beetles - You wouldn't think that beetles would be on the list of pollinators, but here they are! Pollinating beetles eat pollen, nectar, petals, and other parts of flowers, and the messy little fellows drag pollen along with them from flower to flower as they go.


Flies - There are several species of flies, gnats and midges that are known to pollinate. These fly species feed on nectar and pollen, much like bees and wasps. Hover flies, also called flower flies, frequent flowers and often resemble bees and wasps in coloration and body shape.


Butterflies - Although not as proficient as bees, butterflies contribute to pollination during daylight hours. It is a bit more difficult for them to pick up pollen because their long legs tend to keep their bodies well away from it. Butterflies don't have a great sense of smell, and so are attracted to the colors of the flowers rather than the scents.


Moths - Moths do double duty on visiting plants. There are some species that feed at night, and some who feed during the day. Unlike butterflies, moths rely primarily on their sense of smell to locate flowers, especially those who feed at night. Some species of moth feed while hovering, while others land on the flowers to drink up the nectar.


Hummingbirds - Hummingbirds are the primary species of birds pollinating in the United States. They spread pollen around while feeding on the nectar of the flowers. As they poke their long beaks into the flowers, the pollen is dusted onto their faces and heads, and is then taken to the next flower they feed from. These birds do not have a good sense of smell, so they rely on bright colors to indicate where flowers are.


Bats - Although the majority of the bat species that live in my neck of the woods feed on insects, there are a few bat species which frequent the United States and feed on flowers or nectar. These bat species migrate from Mexico, into the desert portions of the southwest. They feed on, and subsequently pollinate, succulent plants and cacti.


Please note that I did not take any of the photos on this page. They are all stock images. I don't want to take credit where credit is not due! My skills as a photographer are a bit too limited to capture these sorts of images!

Thursday, March 3, 2016

Finished Compost

After letting my compost stew over the winter, I decided to dig up the good stuff to prepare for our vegetable garden this spring. So, with shovel and garden fork in hand, I dug out all of the uncomposted material, and made a big heap for the chickens to stir around for me. They just can't resist scratching and pecking at a pile of anything.
Once I got down far enough that the material began to look like dark brown soil, I knew I had hit paydirt. When compost is sufficiently, well, composted it looks much less like what went into it, and much more like dirt or mud. 
My next step was to devise a way of sifting it. Sometimes there are little patches of material that are not sufficiently broken down, or there may be rocks or bits of trash that need to be separated from the compost. Because of the location of our compost bin, a lot of wind-blown litter (candy wrappers, mostly) settles into our pile. 
We have a set of metal steps in the yard that have mesh steps and a mesh top. This is where I separated my compost. In the past we have used a sifter made from 2x4's and wire mesh, but it became yet another thing that our goats destroyed. 
I placed a few storage totes under the steps to catch the compost, and used a flat headed shovel to mix and stir the compost so that it would fall through my sifting apparatus. 
What fell through and was caught in the totes will be mixed into my garden soil and be made into compost tea. 
I combined the two totes into one, put a lid on it and stored it in the fenced-in garden to keep the goats, chickens, wind and rain from ruining it. Last year I made the mistake of leaving my bin where the goats had access. Now we have a very well-fertilized patch of weeds in the middle of the yard.