
A while back I had purchased some fruit to pack in my lunches throughout the week. Like I typically do, I bought way more fruit than my household of two is able to eat before it goes bad. Rather than letting it rot and throwing it away, I decided I would try my hand at drying fruit. So, here's how I did it!

First I undertook the strawberries, and rinsed them thoroughly. I gathered together a cutting board and a paring knife.
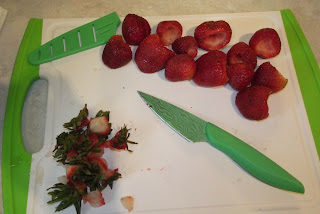
Using the paring knife I hulled the strawberries. You don't want to cut the whole top off of it, or you will lose a lot of fruit. Instead, use the tip of the paring knife to cut out just the white part around and below the stem (it's called a hull.) You can also buy a tool to hull strawberries and tomatoes with. It looks like a miniature melon baller with serrated edges.

Now that your strawberries are hulled, you can begin slicing them. Slice them fairly thin, 1/4" or so, and try to slice them evenly and uniformly as possible. This will allow them all to dry at the same rate.

Lay them out on your dehydrator racks evenly, taking care to separate them.

I put the lid on the strawberries and moved on to my next fruit to be dried.
Next on the agenda was my apples. They had been placed a little too close to the freezer, and had frozen, so I didn't suppose they would be any good for eating.
First I set up a bowl with some Fruit-Fresh. This will prevent oxidization (turning brown.) If you prefer, you can also use dilute lemon juice or apple cider vinegar, salt water, or lemon lime soda for this. There's all sorts of good ideas at
theyummylife.com.
You can peel your apples if you would like, but I opted to keep my skins on. Since I don't have an apple corer, I just cut the fruit away from the core with a sharp knife. If you like gambling, save your seeds to sprout and plant. It's a big gamble to grow an apple tree from seed since you never know what kind of apple your tree will grow.
I cut my apples into slices about 1/2" thick. Be sure that they are of a relatively uniform thickness so that they will all dry evenly.
Next they took a dip in the anti-oxidization bath. I let mine soak around for 10 minutes or so while I did other things in the kitchen.
Drain your slices in a strainer or colander, and rinse them if necessary (if you used the saltwater method, for example.) Shake them around a bit so the water drains away if you need to.
Arrange your apples evenly on your drying racks. Make sure that there is enough room between them that the heat can circulate.
I added my apple racks onto my food dehydrator with my strawberries. I decided to start the apples on the bottom so that they would be closest to the heat and dry faster. Every few hours try to check on your fruit and rearrange the racks so that everything gets enough exposure to the heat and can dry thoroughly. I don't recall exactly how much time my fruit took to dry, so you may just have to wing it! That's what I did when I dried mine!
At the time that I am finishing writing this post (I'm a HUGE procrastinator!) it has been about 3 or 4 months. My dried fruits still look amazing, and we've actually used the dried apples in a recipe. They worked better than the store-bought ones for our Pork Wellington. I simply stored them in canning jars with plastic lids. If you really want them to last, though, you could use a FoodSaver to seal canning lids on them. Since it is a vacuum, there's no air inside to make them stale.
 A while back I had purchased some fruit to pack in my lunches throughout the week. Like I typically do, I bought way more fruit than my household of two is able to eat before it goes bad. Rather than letting it rot and throwing it away, I decided I would try my hand at drying fruit. So, here's how I did it!
 First I undertook the strawberries, and rinsed them thoroughly. I gathered together a cutting board and a paring knife.
 Using the paring knife I hulled the strawberries. You don't want to cut the whole top off of it, or you will lose a lot of fruit. Instead, use the tip of the paring knife to cut out just the white part around and below the stem (it's called a hull.) You can also buy a tool to hull strawberries and tomatoes with. It looks like a miniature melon baller with serrated edges.
 Now that your strawberries are hulled, you can begin slicing them. Slice them fairly thin, 1/4" or so, and try to slice them evenly and uniformly as possible. This will allow them all to dry at the same rate.
 Lay them out on your dehydrator racks evenly, taking care to separate them.
 I put the lid on the strawberries and moved on to my next fruit to be dried.


No comments:
Post a Comment